Training Classifiers for Segmentation
Training machine learning classifiers for segmentation is a multi-step process that includes selecting the inputs, adding features to the features tree, training the model, and then reviewing the training results. You can segment datasets after a classifier is trained.
The following items are required for training a machine learning model for segmentation:
- Training dataset(s) for the input. See Extracting New Images from Marked Slices for information about extracting a training dataset as a subset of the original data.
- A target for the output, which must be a multi-ROI. Multi-ROIs that are used as the target output for semantic segmentation must meet the following conditions:
- For each assigned class in the multi-ROI, a representative number of voxels must be labeled in a semantically significant manner (see Creating Multi-ROIs for Segmentation).
- Training is always done on the image plane and all segmentation labels must be created on that plane.
- The multi-ROIs must have the same geometry as the input training data.
The following items are optional for training a machine learning model for segmentation:
- An ROI mask(s), for defining the working space for the model (see Creating Mask ROIs).
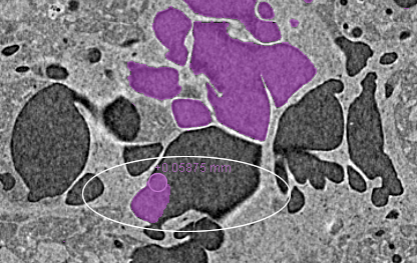
As shown in the illustration below, three distinct material phases in a training dataset were labeled as separate classes. You should note that labeling can be done directly on a multi-ROI as of Dragonfly version 2020.1 (see Labeling Multi-ROIs for Segmentation), or on multiple regions of interest, from which you can create a multi-ROI (see Creating Multi-ROIs from Regions of Interest).
The figure below shows an example of segmentation labels provided to the classifier for pixel-based training.
Segmentation labels for pixel-based training

The figure below shows an example of segmentation labels provided to the classifier for region-based training.
Segmentation labels for region-based training

Important Whenever you create segmentation labels for region-based training, you must ensure that the region of interest of one class does not overlap the region of another class. If required, you can generate the regions prior to creating the segmentation labels. Refer to the instructions Generating Regions for information about selecting region generators and generating regions.
You can use any of the segmentation tools available on the ROI Painter and ROI Tools panels to label the voxels of a multi-ROI for training a deep model for semantic segmentation (see ROI Painter and ROI Tools). You should note that training is always done on the image plane and all classes must be labeled on that plane.
- Create a new multi-ROI that has the same geometry as your training dataset (see Creating New Multi-ROIs).
- Click the Add button in the Labels box on the Data Properties and Settings panel and then do one of the following:
- Choose Add One Label in the drop-down menu to add a single class to the multi-ROI.
- Choose Add Multiple Labels in the drop-down menu then select the required number of classes (labels) in the Add Labels dialog.

The requested number of classes are added, as shown below.
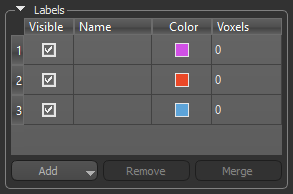
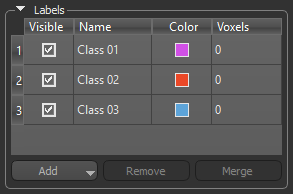
- Assign a name to each row in the Labels box, recommended.
- Maximize the image plane view of your dataset, recommended.
This is the plane in which the data was acquired (see 2D View Pop-Up Menu).
You can also change the zoom factor and position, as well as adjust window leveling to facilitate segmentation (see Using the Manipulate Tools and Window Leveling).
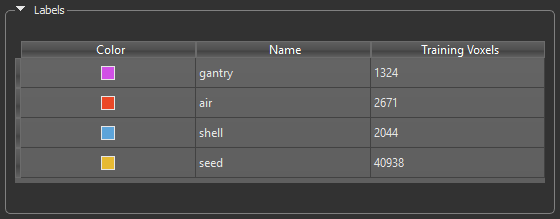
- Select a row in the Labels box and then label a representative number of voxels that correspond to that class.
For example, you may need to label voxels that correspond to a specific material type or phase or to an anatomical structure.
Note You can use any of the segmentation tools available on the ROI Painter and ROI Tools panels to label the multi-ROI (see ROI Painter and ROI Tools).
- Label a representative number of voxels that correspond to all other classes included in the multi-ROI.
The number of labeled voxels that correspond to each class is indicated in the Voxels column.
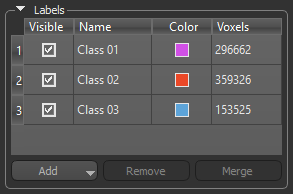
Important The multi-ROI does not need to be full segmented.
- Save the multi-ROI, if required (see Exporting Objects).
As an alternative to working directly on a multi-ROI, you can label voxels on multiple regions of interest and then create a multi-ROI from those labeled ROIs (see Creating Multi-ROIs from Regions of Interest).
Refer to the following instructions for information about creating new models for machine learning segmentation..
- Choose Artificial Intelligence > Machine Learning Segmentation on the menu bar.
The Machine Learning Segmentation dialog appears.
- Click the New button on the Model panel.
- Enter the required information in the Details box.
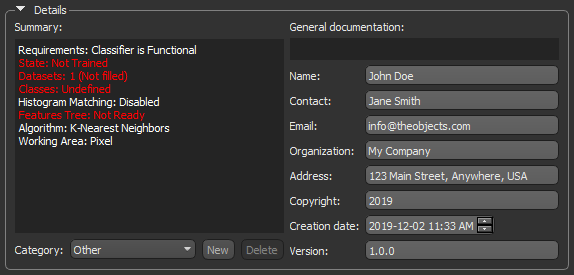
Note Refer to Model Details for information about entering a model category and general documentation.
- Continue to the next section to learn how to choose the model inputs (see Choosing the Model Inputs).
Refer to the following instructions for information about selecting the model inputs, which include the training dataset(s), segmentation labels, and mask(s). See Input Panel for more information about model inputs.
- Click the Input tab.
The Input panel appears (see Input Panel).
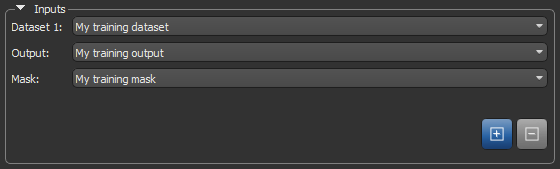
- Choose your training dataset in the Dataset 1 drop-down menu.
Do the following to add another dataset:
- Click the Add
 button in the Inputs box.
An additional input appears.
- Choose the additional input in the new Dataset 2 drop-down menu.
- Click the Add
- Choose the required multi-ROI in the Output drop-down menu.
The Labels box is automatically populated with the labels in the multi-ROI.
Note The color and name of each label is saved with the model and appears on the Model panel after the model is trained.
- Choose a mask in the Mask drop-down menu, optional.
Adding masks, which must include all of the segmentation labels and must be created on a region of interest, can help reduce training times and increase training accuracy. Without a mask, the whole dataset(s) will be used for training.
- Continue to the next section to learn how to select the model methods (see Selecting the Model Methods).
Refer to the following instructions for information about selecting the model methods, which include the machine learning algorithm, working area, and features tree.
Refer to the following instructions for information about choosing an algorithm for training a classifier (see Algorithms for information about the algorithms available for machine learning segmentation).
- Click the Method tab.
The Method panel appears (see Method Panel).
- Choose an algorithm in the Algorithm drop-down menu.
You should note that different algorithms will react differently to the same inputs.
- Modify the default setting of the selected algorithm, if required.
To modify the default settings, check the Advanced box and then choose the required settings.
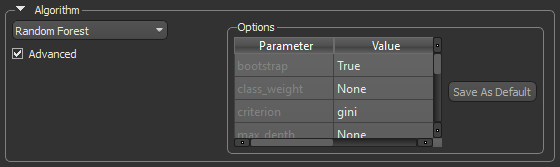
Note If required, you can save your changes as the default settings for an algorithm by clicking the Save As Default button. Otherwise, your changes will be saved with the model only.
Refer to the following instructions for information about choosing a working area. (see Working Areas).
- Choose a working area — Pixel, Region, or Majority vote.

- Do one of the following:
- If you selected Pixel as the working area, continue to Adding Dataset Features.
- If you selected Region or Majority vote as the working area, continue to the next step to learn how to compute regions.
- Choose a region generator and the required settings in the working area.
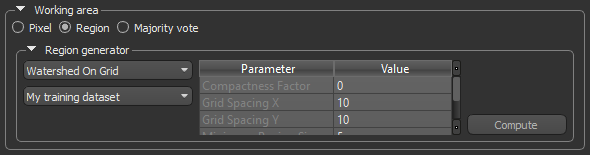
Note Refer to the topic Generating Regions for information about the available region generators, as well as instructions for computing regions.
- Do one of the following when you are satisfied with the result:
- If you selected Region as the working area, continue to Adding Region Features.
- If you selected Majority vote as the working area, continue to Adding Dataset Features.
Refer to the following instructions for information about added features to a selected working area.
In pixel-based training, the dataset features extracted are the intensity value(s) of the pixel directly. See Dataset Features for more information about the dataset features.
- Select the Apply histogram matching option, if required.
- Select the dataset to which you want to add a dataset feature.
- Select the required dataset feature in the Dataset Features box and then click the Add button.
The dataset feature is added to the selected dataset.
Note You can also right-click the required preset in the Dataset Features box and then choose Add to and then select an option in the submenu. You can also choose Add to All to add the selected preset to all datasets in the features tree.
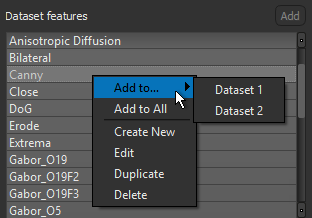
- Add additional dataset features, as required.
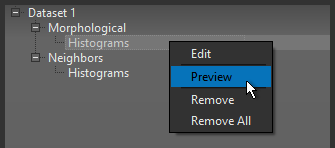
- Preview the dataset features, recommended.
To preview a dataset feature, right-click the feature preset and then choose Preview in the pop-up menu.
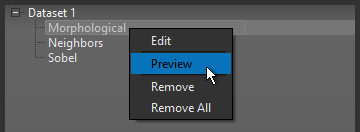
The Preview Trainer dialog appears. Refer to the topic Previewing Dataset Features for information about previewing the filters in a dataset feature preset.
- Edit the dataset feature(s), as required (see Editing Dataset Features).
- Continue to the topic Training Your Model.
When the classifier works on regions and not directly on the pixel level, information is extracted from regions to build the feature vector. The features extracted from the region can be different metrics used to represent the region itself. For example, the histograms of the intensities of the pixels in the given region, or to compare a given region and its surrounding, as is done with the Earth Movers Distance metric. See Region Features for more information about region features.
- Select the Apply histogram matching option, if required.
- Add the required dataset features to the features tree.
See Adding Dataset Features for information about adding dataset features.
- Select the dataset feature to which you want to a region feature.
- Select the required region feature in the Region Features box and then click the Add button.
The region feature is added to the selected dataset feature.
Note You can also right-click the required preset in the Region Features box and then choose Add to and then select an option in the submenu. You can also choose Add to All to add the selected preset to all dataset features in the features tree.
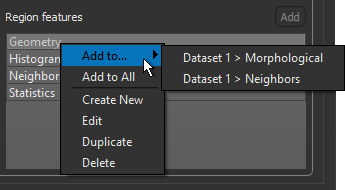
- Add additional region features, as required.
- Preview the region features, recommended.
To preview a region feature, right-click the feature preset and then choose Preview in the pop-up menu.
The Preview Trainer dialog appears. Refer to the topic Previewing Region Features for information about previewing the filters in a region preset.
- Continue to the topic Training Your Model.
You can train a classifier after you have added the required features.
- Click the Train button at the bottom of the Machine Learning Segmentation dialog.
When feature extraction and model fitting is complete, a preview of the classification result appears in the current view, as shown below.
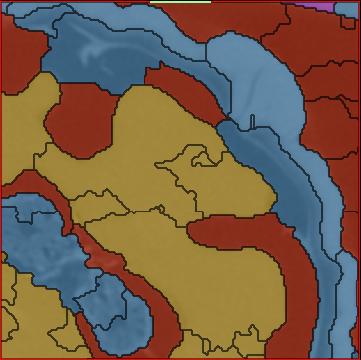
Note You can threshold the results on the Result panel, as well as evaluate the proposed segmentation with the help of a confidence map (see Preview Rendering).
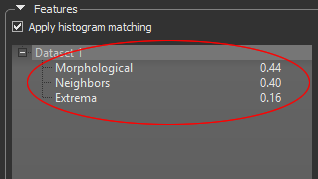
- Evaluation the results of the initial training.
The relevance of each feature preset — on a scale of 0 to 1 and totaling one 1 for all presets — is displayed in the features tree to help you judge whether the feature preset provides helpful information for the classification or not. Features determined to be ineffective can be edited or removed from the features tree.
- Edit a feature preset, if required (see Editing Feature Presets).
- Do the following to remove any feature preset determined to be ineffective:
- Right-click the feature preset and then choose Remove in the pop-up menu.
- Right-click the feature preset and then choose Remove All in the pop-up menu.
- Click the Train button to re-train the classifier, if you made any modifications to the features tree.
- Preview the segmentation results on additional image slices or other views of the dataset, recommended.
- Scroll to the required image slice and then click the Preview button at the bottom of the dialog.
- Review the results with the options available on the Result panel (see Preview Rendering).
- When you are satisfied with the training results, click the Segment button at the bottom of the dialog.
By default, a fully segmented multi-ROI will be generated and added to the Data Properties and Settings panel. You can also export a confidence map, if required (see Export).


